Showing posts with label great friend. Show all posts

Thursday, April 29, 2010

Royal Blog Tour: Elegant Trio Stencils

I have come to love all the Decor Elements from Stampin' Up! Not only can you use these items to decorate your home but you can incorporate them into your smaller paper crafting projects. I decided to challenge myself on this tour by using stencils on my projects and most of the time, stencils are too large for card making but the Elegant Trio Stencils set is just perfect!


My first project is a sample of a Mother's Day card that I am sending to the mothers staying at the Ronald McDonald House in Orange County.


Stampin' Up! has partnered with the Ronald McDonald House Charity and allows demonstrators to help others while sharing our love of this craft. While each home is different, my group sends in different gifts or cards for each special holiday or event. I got my color inspiration from our new Color Collection, which will begin in July 2010. If you are familiar with Stampin' Up!, you'll notice that a favorite past in color will be making its way back!
{Project Details}
Stamps: French Filigree
Ink: Certainly Celery, Melon Mambo, Rose Red, and Wild Wasabi Classic Ink Pad.
Paper: Certainly Celery Card Stock; Very Vanilla and Wild Wasabi Textured Card Stock.
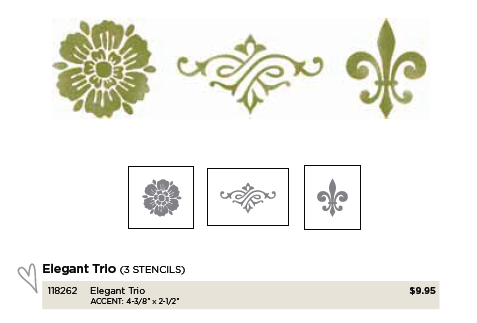
Accessories: Elegant Trio Stencil, Sponge Dauber, Very Vanilla Smooch Spritz, Melon Mambo 1/2" Polka-Dot Ribbon, Modern Label and Word Window Punches; Stampin' Dimensionals.

While Mother's Day is very near, a special birthday for one of my best friend (as well as a fellow Stamp Ink Diva) is also near the same time. She loves things that have frills and are antique. So, I created this with her in mind.

  
My personal style tends to lean more on the simple, modern, and whimsical side. But I am loving the antique elements more and more!
{Project Details}
Stamps: Bella Toile, Oval All, and Gallery.
Ink: Chocolate Chip, Pretty in Pink, Soft Suede, and Wild Wasabi Classic Ink Pads; Versamark Ink Pad.
Paper:Chocolate Chip, Pink Pirouette, and Whisper White Card Stocks; Chocolate Chip Patterns Designer Series Paper.
Accessories: Elegant Trio Stencils, Sponges, Clear Embossing Powder, Heat Tool, Large Oval Punch, Pretty in Pink 5/8" Satin Ribbon, Log Cabin Smooch Spritz, Stampin' Dimensionals.

My final project brings us to a scrapbook page that I am making in preparation for a special photo I want to capture at my Ladies Tea.

 
I am planning a Ladies Tea fundraiser for my children's school and can't wait to capture all my friends dressed up and with their party hats!
{Project Details}
Stamps: Great Friend and Framed with Love
Ink: Baja Breeze, River Rock, and  Soft Suede Classic Ink Pads; Versamark Ink Pad.
Paper: Certainly Celery, Crumb Cake (Kraft), So Saffron, Soft Suede,  and Whisper White Card Stocks; Presto Patterns Specialty Designer Series Paper.
Accessories: Elegant Trio Stencils, Clear Embossing Powder, Heat Tool, Sponge, Brayer, Big Shot, Top Note Die, Log Cabin and Very Vanilla Smooch Spritz, Fancy Flower and Scallop Trim Border Punches, Old Olive 1-1/4" Striped Ribbon, Button Latte, and Pretties Kit (large clear rhinestone)

 Please leave a comment after this post along with your email address to be entered into a random drawing for your very own set of Elegant Trio Stencils. One lucky winner will be chosen and announced the day after the end of this tour. (Sorry, only for U.S. Residents and non-demonstrators.) Also, remember to subscribe to my blog so that you'll get updates on the tutorials for these projects and more.


Thanks for stopping by and hope this has inspired you to try using stencils on your own projects.


Wednesday, April 29, 2009

Matchbox Messages


I wanted to share a few items we did at a workshop last weekend. The inspiration for the matchbox came from a "Stampin' Success" publication. "Stampin' Success" is a monthly publication that Stampin' Up distributes to each demonstrator for inspiration and ideas to share with our own customers but also connects us with other demonstrators throughout the world. This is one of many ways that Stampin' Up supports their demonstrators. 


(Sample made by Gladys, hostess of workshop)

I chose this demonstration because its quick, easy, and oh so cute. Look how simple it is to dazzle up a chocolate nugget with Stampin' Up So Saffron Designer Series Paper! Four of these chocolates fit perfectly into the Matchbox (made by using Stampin' Up's exclusive Matchbox Bigz XL Die with the Big Shot). Then using Kiwi Kiss cardstock, we made a belly band.  We chose to use this shaped tag, which is one of three tag dies found on the same Matchbox Die. And wouldn't you know, Stampin' Up has a stamp that matches perfectly with that tag! ("Great Friend" 113792) (TIP: to get a perfect image on your tag/card, you can use the Stamp-A-Ma-Jig Tool.)


(Sample made by Gladys, hostess of workshop)

We used this stamp from "Matchbox Messages"(113800), which also coordinates with the Matchbox Bigz XL Die, to stamp onto Very Vanilla cardstock with Close to Cocoa Classic Ink Pad. Using the 1 1/4" Circle Punch, the image was punched and placed onto the scallop circle punched Sweet Slumber Designer Series Paper. We used Stampin' Up markers to highlight the flower image, but you can also use the markers on the stamp itself to get a colorful image. The finished product was then placed on top of a peppermint patty. To complete the party favor, we placed another scallop circle punched Sweet Slumber Designer Series Paper onto the back. Delicious to eat AND look at!


Thursday, April 23, 2009

Great Friend


Splitcoaststampers post daily challenges. Monday is techniques & scrapbook inspiration. Tuesdays is color challenges. Wednesdays is sketch challenge. (And so on and so on.) The color challenge I chose to do was to create a card using Pink Passion, Chocolate Chip, and Kiwi Kiss (colors from Stampin' Up). I love Kiwi Kiss and it seems to be a favorite of a lot of others too! I also combined this color combination with MOJO 82 sketch challenge. Pink Passion is definitely a bright pink. It gives the card that pop!


To make this card, you'll need:
Great Friend Stamp Set (113792)
Chocolate Chip Classic Ink Pad
8 1/2" x 5 1/2" Chocolate Chip Cardstock
3 7/8" x 5 1/4" Pink Passion Cardstock
3 1/2" x 5" Kiwi Kiss Cardstock
TWO 2" x 2" squares of Chocolate Chip Cardstock
1 7/8" x 1 7/8" square of Whisper White Cardstock
1 7/8" x 1 7/8" square of Raspberry Tart Designer Series Paper
2 1/2" x 2 1/2" square of Raspberry Tart Designer Series Paper
3" x 3" square of Raspberry Tart Designer Series Paper
4 1/2" of Chocolate Chip 5/8" Grosgrain Ribbon
Pink Passion Stampin' Up Marker
Pretties Kit (3 white half pearls)
Stampin' Dimensinals
Scallop Edge Punch
Bigz Beautiful Butterflies Die
Texturz Plates (Stampin' Up! Backgrounds 1)
Big Shot


1. Score the 8 1/2" x 5 1/2" Chocolate Chip card at 4 1/4" and fold at the score line. You should have the base of your card at 4 1/4" x 5 1/2". 

2. Place the Kiwi Kiss Cardstock onto the Texturz Plates and run through the Big Shot Machine. (I used the large polka dots but you can certainly use what ever you'd like.)

3. Punch the bottom edge of the Kiwi Kiss Cardstock with the Scallop Edge Punch.

4. Next, wrap the Chocolate Chip Grosgrain Ribbon around the cardstock near the scalloped edge with the edges on the back side of the cardstock.

5. Trim the bottom of the Pink Passion Cardstock with the scallop edge punch and layer the Kiwi Kiss onto it.

6. Layer onto one of the 2" Chocolate Chip square pieces with a 1 7/8" square of the Raspberry Tart Designer Series Paper. Adhere finished product to the top center of the card with a corner facing the top.

7. Ink the sentiment with Chocolate Chip Classic Ink and stamp onto the 1 7/8" Whisper White Square and using the Pink Passion Marker, place stitches on the perimeter of the square.

8. Layer onto the remaining 2" Chocolate Chip square with the 1 7/8" Whisper White cardstock and layer the finished product onto the card overlapping the Chocolate Chip square with the Raspberry Tart Designer Series Paper.

9. Fold the 3" Raspberry Tart Designer Series Paper in half and place onto the medium sized butterfly die and place the 2" square onto the small butterfly. Run through the Big Shot Machine.

10. Place the larger butterfly onto the left hand side of the card with Stampin' Dimensionals.

11. Place adhesive to the center "body" of the small butterfly and adhere to the large butterfly. Fold the wings upward to give it more dimension.

12. Using the Pretties Kit, place three half pearls onto the center of the butterfly with glue dots.

(TIP: If you don't have the Big Shot, you can use the Kiwi Kiss cardstock as is without the texturz plates and you can use the butterfly stamp from the Great Friend Set and cut by hand instead of using the Bigz Beautiful Butterflies die.)