Showing posts with label fabric. Show all posts

Friday, December 9, 2011

Creative Souls Holiday Party

It was a fun night for our Creative Souls, my creative Stamp Ink Divas group. We decided to get together in honor of Christmas. It was really nice to see everyone (minus a few members).
We worked on the Christmas Keepsake Card Box as our project that evening.
But we needed some delicious snacks, so I baked some cookies and then stamped them while still hot with our sweet pressed cookie stamps. When you order the cookie stamps, they come with some great recipes, but because I was short on time (and a bit of laziness), I went with frozen cookies. I think the stamp still worked fine but if you do use frozen cookies, remember to press them after they are finished cooking to get the best images and then let them cool.
Then, we gorged ourselves on appetizers that evening. But one treat I had to share was one that Stephanie Gaines made.
Cake pops! But check out how she decorated the container! Isn't it just beautiful? You can visit her here for more details.

Finally, we had our gift exchange and here are what some of them made.

Creative, creative, creative! 

Thanks for stopping by!
{Project Details}


To order on-line 24/7 click here.

Wednesday, February 16, 2011

Explore Your Creativity with Stampin' Up!

I wanted to share with you this video created by Shelli Gardner, Co-Founder of Stampin' Up! Just look at all the possibilities with products from Stampin' Up!, something I just LOVE!! I see quite a few projects that I would love to CASE--copy and share everything!


To order on-line 24/7 click here.


Monday, December 20, 2010

5 Days 'til Christmas (Occasions Mini Sneak Peak)

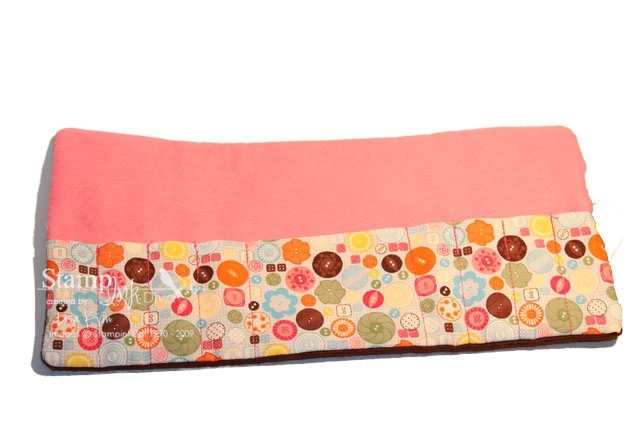
Have you made any projects using Stampin' Up! fabric? Stampin' Up! has manufactured the most adorable prints, and they are larger than a regular fat quarter.

I've seen aprons and fabric rolls with sleeves for crayons and activity books, so I decided that I would make one as a stocking stuffer for Riley (my youngest) using of course, Stampin' Up!'s own fabric.  

 
(You can find directions from Skip to My Lou.)

What do you think of this print? (There's even more fabric in the new Occasions Mini Catalog--products available January 4th.)

I'm hoping that this will deter her from writing or drawing on other places like my fireplace. (If you know how to get crayon off stone, I'd love your advice.)

Thanks for stopping by and don't forget to leave a comment.

{Project Details}
Sweet Stitches Designer Fabric (121818)--available January 4th.

To order on-line 24/7 click here.

Thursday, November 4, 2010

Wicked Cool Royal Blog Tour

 
Welcome all ye travelers! Welcome to my humble abode: Stamp Ink Diva! Halloween has passed but the fun projects have not. May I entice you to use this Wicked Cool Stamp Set (118738-(W) wood mount/120600-(C) clear mount ) for next year's creations and maybe even convince you to use it for the upcoming holidays?
(When I first signed up to do this tour, all I could think of was Halloween and forgot that the tour would be after that! Reminder for next year...look at the dates before I sign up! LOL)

So, I decided to share some ideas that could be used for Halloween and for other holidays.

Let's begin with this:

Some of my favorite things include cupcakes, ribbon, and buttons. So naturally, this project was a delight to make. This entails using our gorgeous ribbon as the icing and our Wicked Cool Stamp set as our cherry on top! Here's a closer look at the button spider:


What's more wicked than a cupcakeful of chocolate kisses inside?

For my next project, I wanted to share some other uses for this Wicked Cool set.

Isn't it cute? I used the Playful Pieces Set to make this present and changed up the colors to make this witch into an elf!

And then, what do you think of this:


Now the witch is dressed like "mrs. claus" and bearing this sign:


I'd love to hear what you thought of my projects. Please leave me a comment and your email address to be entered into my blog candy drawing. (If you don't feel comfortable leaving your email address in the comment section, please feel free to contact me.) Also, my apologies to my fellow demonstrators but this blog candy is only for NON-demonstrators and US Residents only.

What is this blog candy?
A Stampin' Up! Reusable bag with the Holiday Hoopla -Clear Mount Stamp Set.


Happy Holidays!

Thanks for stopping by and enjoy the rest of the tour! (You can go to http://www.theroyalblogtour.net/ to enjoy the projects if you missed the tour.)

{Project Details}
Stamp(s): Playful Pieces (Hostess Set Level 3), Tags Till Christmas (120847-W/121169-C), and Wicked Cool (118738-W/120600-C);
Ink: Basic Black, Garden Green, and Real Red Classic Ink Pads; Baja Breeze, Basic Black, Chocolate Chip, Garden Green, and Real Red Stampin' Write Markers.
Paper: Chocolate Chip, Garden Green, Real Red, Rich Razzleberry, and Whisper White Card Stock\
Accessories: Big Shot, Perfect Settings XL and Two Tags Bigz Dies; 3/4" x 15/16" Oval, Jewelry Tag, Scallop Square, 1-1/4" Square, 1/16" Circle, 1-1/4" Circle, 1-3/8" Circle, 1-3/4" Scallop Circle, and 1-3/4" Circle Punches; Candy Cane Christmas Designer Fabric, Natural Hemp Twine, 1-1/4" Basic Black Striped Grosgrain and 5/8" Old Olive Grosgrain Ribbons; Silver Glass Glitter; Candy Cane Big Designer Buttons, and Designer Buttons-Neutral Collection.


Monday, October 4, 2010

Life is Beautiful

So when I don't post regularly, you know I've been busy. (Good busy because its for my kids and their school.) But it also puts a little cramp in my stamping. So, I tend to CASE (copy and share everything) to help me get my stamping mojo back. Today's share is just that.


The original card was designed by Shelli Gardner (co-founder of Stampin' Up!) and her daughter Sarah. What I loved about it was how it incorporated our FABULOUS fabric and a new "technique" that I love (the swirled fabric center that looks like a lollipop).

You'll need to start with Crumb Cake Card Stock measured at 8-1/2" by 5-1/2".
  1. Fold in half so it measures 4-1/4" x 5-1/2".
  2. Ink the image with Early Espresso Classic Ink Pad and stamp in the center of the Crumb Cake card base.
  3. Adhere fabric to the multipurpose adhesive sheet and run through Big Shot using the Beautiful Wings Die. Peel off the back and place on the center of the stamped image.
  4. Stamp the greeting with Early Espresso onto the Watercolor Paper. Punch out with the Decorative Label.
  5. Tear the Watercolor Paper along the top and bottom and center it above the butterfly.
  6. Using a Piercing Tool and Mat Pack, poke a hole above the stamped image and place the glimmer brad in the center.
  7. Cut a 1/2" x 3-3/4" strip of Baja Breeze. Then, tear along the bottom edge and place about an 1" from the center bottom.
  8. Cut a 1/4" x 4-1/4" strip of Real Red Textured Card Stock and adhere above the torn Baja Breeze Card Stock.
  9. Using a glue dot, stick the small Paper Daisy to the center of the Real Red strip. Then add the Rhinestone to the center of the Daisy.
  10. For the center of the Butterfly, punch a 1" circle of scrap card stock. Cover the entire piece with Sticky Strip.
  11. Take the coordinating fabric (5/8" x 10" strip), place one edge in the center of the 1" circle. Then, twist and twirl the fabric tight and stick along the circle starting from the center out until you get a coiled "lollipop". Tuck the end under the coil.
  12. Using Snail or Sticky Strip, adhere the coiled "lollipop" to the center of the butterfly and voilà! 


{Project Details}
Stamp: Style Beautiful (116984-W/120483-C)
Ink: Early Espresso Classic Ink Pad
Paper: Baja Breeze and Crumb Cake Card Stock; Real Red Textured Card Stock, and Watercolor Paper.
Accessories: Big Shot and Beautiful Wings Die; Candy Cane Designer Fabric, Big Shot Multipurpose Adhesive Sheets, Piercing Tool and Mat Pack; 1" Circle and Decorative Label Punches; Glimmer Brights Brads, Paper Daisies, Basic Rhinestone Jewels; Sticky Strip, Mini Glue Dots, and Snail.

To order on-line 24/7 click here.